Howdy,
OK, so i think this is working much nicer now - there is a single gotcha (which ill explain below) that i hope to improve once i think of a good solution - fair warning, this will be a verrrrry long reply since im going to post code examples inline (as its nicer to have them here in the post so other might get use from them rather than some .zip file that may get lost etc).
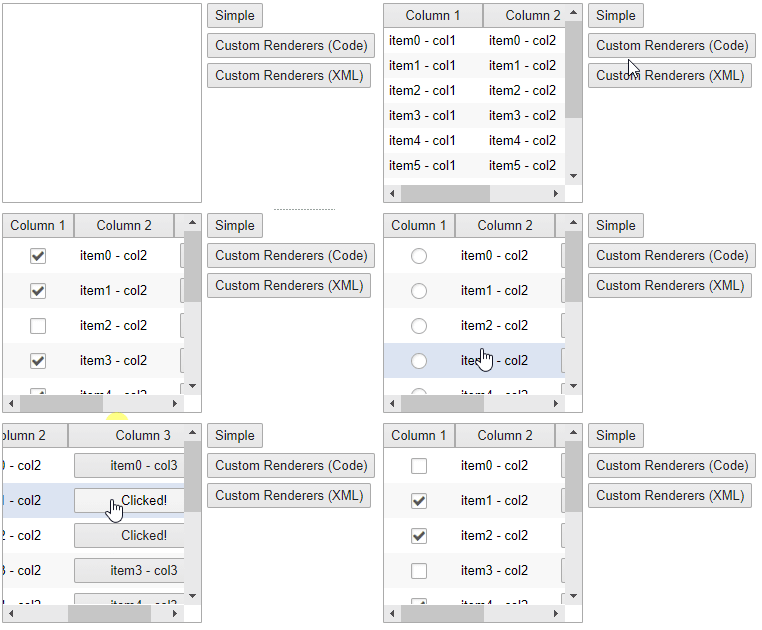
Right, so first, the result:

The first one (Simple) is easy:
// clear table contents and header contents
tv.clearContents(true);
// add new columns
tv.addColumn("Column 1").width = 100;
tv.addColumn("Column 2").width = 100;
tv.addColumn("Column 3").width = 100;

// build data
var ds = new ArrayDataSource<Dynamic>();
for (a in 0...10) {
    ds.add({
        column1: "item" + a + " - col1",
        column2: "item" + a + " - col2",
        column3: "item" + a + " - col3"
    });
}

tv.dataSource = ds;
You clear the table and the header and add some new columns - done. When you add a new column a new default itemrenderer is created for you (this is the gotcha later).
The second (Custom Renderers Code) will create a bunch of item rendrerers in code:
// clear table contents and header contents
tv.clearContents(true);
// add new columns
tv.addColumn("Column 1");
tv.addColumn("Column 2").width = 100;
tv.addColumn("Column 3").width = 150;

// gotcha - if you are creating custom renderers, you need to first remove all existing renderes
// this is because when you add columns TableView will create simple renderers for it which, in
// this case, you dont want - ill think about improving this somehow, but for now you'll have
// to make this call
tv.itemRenderer.removeAllComponents();

// custom item renderers
var itemRenderer = new ItemRenderer();
itemRenderer.verticalAlign = "center";
var checkbox = new CheckBox();
checkbox.id = "column1";
checkbox.horizontalAlign = "center";
itemRenderer.addComponent(checkbox);
tv.addComponent(itemRenderer);

var itemRenderer = new ItemRenderer();
itemRenderer.verticalAlign = "center";
var label = new Label();
label.id = "column2";
itemRenderer.addComponent(label);
tv.addComponent(itemRenderer);

var itemRenderer = new ItemRenderer();
var button = new Button();
button.percentWidth = 100;
button.id = "column3";
itemRenderer.addComponent(button);
tv.addComponent(itemRenderer);

// build data
var ds = new ArrayDataSource<Dynamic>();
for (a in 0...10) {
    ds.add({
        column1: Std.random(2) == 0,
        column2: "item" + a + " - col2",
        column3: "item" + a + " - col3"
    });
}

tv.dataSource = ds;
The process is pretty much the same except for the “gotcha” (in the comment of the source), his is because default item renderers are created when you add the columns, so for you to use custom ones you’d need to remove them and “start again”… i think eventually a “replaceRenderer” or something might be a nice compromise (?)
And finally the third one (Custom Renderers XML) will do pretty much the same as the second, except this time it will use XML for the renderers:
// clear table contents and header contents
tv.clearContents(true);
// add new columns
tv.addColumn("Column 1");
tv.addColumn("Column 2").width = 100;
tv.addColumn("Column 3").width = 150;

// gotcha - if you are creating custom renderers, you need to first remove all existing renderes
// this is because when you add columns TableView will create simple renderers for it which, in
// this case, you dont want - ill think about improving this somehow, but for now you'll have
// to make this call
tv.itemRenderer.removeAllComponents();

// custom item renderers
// build using a macro
var itemRenderer = ComponentMacros.buildComponent("assets/renderer1.xml");
tv.addComponent(itemRenderer);

var itemRenderer = new ItemRenderer();
itemRenderer.verticalAlign = "center";
var label = new Label();
label.id = "column2";
itemRenderer.addComponent(label);
tv.addComponent(itemRenderer);

// using MyRenderer class
tv.addComponent(new MyRenderer());

// build data
var ds = new ArrayDataSource<Dynamic>();
for (a in 0...10) {
    ds.add({
        column1: false,
        column2: "item" + a + " - col2",
        column3: "item" + a + " - col3"
    });
}

tv.dataSource = ds;
and the XMLs:
renderer1.xml:
<item-renderer verticalAlign="center">
   <optionbox id="column1" horizontalAlign="center" />
</item-renderer>
renderer2.xml:
<item-renderer>
    <button id="column3" width="100%" />
</item-renderer>
And the source of MyRenderer.hx:
package;

import haxe.ui.core.ItemRenderer;
import haxe.ui.events.MouseEvent;

@:build(haxe.ui.macros.ComponentMacros.build("assets/renderer2.xml"))
class MyRenderer extends ItemRenderer {
    public function new() {
        super();
    }

    @:bind(column3, MouseEvent.CLICK)
    private function onButtonClick(e) {
        column3.text = "Clicked!";
    }
}
So hopefully that should all be working much cleaner / dynamically now - with the exception of that “gotcha” which i need to think about a little more.
Sorry for the huge post! But as i mentioned, its nicer to have code inline alot of the time!
Cheers,
Ian
PS: you’ll need latest haxeui-core from git for these features
PPS: let me know if that works!!
EDIT: i had rename TableView::clear => TableView::clearContents as “clear” conflicts with flixels FlxSpriteGroup