I have a simple program to load a bitmap using import openfl. … statements and that workspace loads fine in Visual Studio Code. It also runs when I use the Terminal and “lime test neko”. I have another program that is supposed to use haxeui-openfl to show a form element and when it loads then Studio says “Lime completion setup failed”, etc. If I command in the Terminal “lime test neko” I get the error, “Error: Could not find haxelib “haxeui”, does it need to be installed?”.
So I go back to the first program, the one that works, and type “import haxe.” but there is no “ui” completion suggested for it. So, I complete the line as “import haxe.ui.toolkit.core.Macros;” and save the file and close the workspace and then open the workspace again and now Studio reports an error, “Unable to build cache - completion features may be slower than expected. Try fixing the error(s) and restarting the language server.”
I think my software is up-to-date. Studio says there is no update for Studio. I have the extensions update turned off. In the Terminal I type “haxelib list” and get…
actuate: [1.8.9]
box2d: [1.2.3]
chartjs: [1.0.2]
firetongue: [2.0.0]
flixel-addons: [2.9.0]
flixel-demos: [2.7.3]
flixel-templates: [2.6.5]
flixel-tools: [1.4.4]
flixel-ui: [2.3.3]
flixel: [4.8.1]
format: [3.5.0]
haxeui-core: [1.1.2]
haxeui-openfl: [1.1.0]
haxeui-theme-material: [1.0.0]
hscript: [2.4.0]
hxcpp: [4.1.15]
layout: [1.2.1]
lime-samples: [7.0.0]
lime: [7.8.0]
openfl-samples: [8.7.0]
openfl: [9.0.2]
svg: [1.1.3]
And Haxe is…
Haxe Compiler 4.1.3 - ©2005-2020 Haxe Foundation
Computer is a 64 Bit Microsoft Windows 8.1 running Visual Studio Code 1.48.2.
I just now installed haxeui-core from git but that is also [1.1.2].
I am a Haxe newbie, so I apologize if the answer should be obvious.
Hi there,
So it sounds like you might be mixing up haxeui v1 (which is called “haxeui” on haxelib) and haxeui v2 (which is called “haxeui-core” on haxelib + a backend, like “haxeui-openfl”).
Is there any chance you could zip your project, or a small test project, and attach it here so we can take a look?
Cheers,
Ian
1 Like
I was looking around for code examples and found a program on GitHub at MintPaw / HaxeuiTest. You can view the code here…
https://github.com/MintPaw/haxeuiTest
That is the one that causes Visual Studio Code, when the workspace is opened, to say, “Lime completion setup failed. Is the lime command available? Try running “lime setup” or changing the lime.executable" setting. Source: Lime (Extension)”.
I did run lime setup and got this…
hxcpp is up to date
lime-samples is up to date
I did change lthe Visual Studio Code ime.executable setting from being just “lime” to “haxelib run lime”. (Even though, simply referring to the lime command from any folder using the Terminal works.)
The program that does work is the sample program, “DisplayingABitmap” from openfl.org.
https://www.openfl.org/learn/haxelib/tutorials/displaying-a-bitmap/
Visual Studio Code does not like the line, “import openfl.display.BitmapData;”, saying it is an unused iimport, but the program runs and displays the bitmap that says, “OpenFL”.
If you need more information, let me know.
Hi. Looking at the code sample you linked to, it appears that code is using HaxeUI v1. To get things working, you should be using v2 (haxeui-core and whichever backend… haxeui-openfl in your case). You can tell by looking at project.xml, where you’ll see <haxelib name="haxeui" />. If you have haxeui-core and haxeui-openfl installed, you can change the project.xml to include these instead:
<haxelib name="haxeui-core" />
<haxelib name="haxeui-openfl" />
There may be other issues unrelated to haxeui in your current setup, but this is a good place to start.
2 Likes
Thank you so much! That helped. I have lime completion now, though it is sometimes a bit slow in my Visual Studio Code. The HaxeuiTest sample program I mentioned above does have other issues, such as a reference to other classes on drive D, and so, instead of changing it, I changed the working DisplayingABitmap program.
I added to the project.xml…
  <haxelib name="haxeui-core" />
  <haxelib name="haxeui-openfl" />
I rewrote the DisplayABitmap program and it runs using “lime test neko” or “lime test html5”. (I could not get rid of “Sprite” and “super()” without errors at compile time, and so they remain in the program even though I do not know why they are needed.)
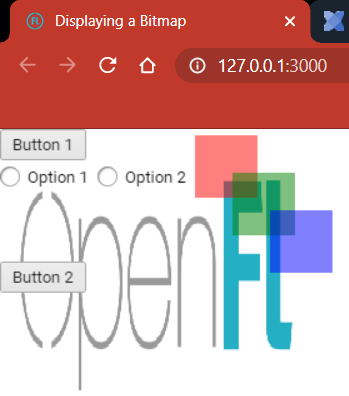
The code for Main.hx …
package;

// Original file was from  https://www.openfl.org/learn/haxelib/tutorials/displaying-a-bitmap/

import haxe.ui.components.Spacer;
import haxe.ui.components.Image;
import haxe.ui.components.Button;
import haxe.ui.components.OptionBox;
import haxe.ui.containers.VBox;
import haxe.ui.containers.HBox;
import haxe.ui.core.Screen;
import haxe.ui.Toolkit;
import openfl.display.Sprite;

class Main extends Sprite {
	public function new () {
		super ();
		Toolkit.init();

		// Add "OpenFL" image.

		var picture = new Image ();
		picture.width = 250;
		picture.height = 250;
		picture.resource = "assets/openfl.png";

		// Define a vertical layout container.

		var vbox1 = new VBox();

		// Add a button to the vertical layout container.

		var button1 = new Button();
		button1.text = "Button 1";
		vbox1.addComponent(button1);

		// Add horizontal layout container.

		var hbox1 = new HBox();

		// Add options to horizontal layout container.

		var option1 = new OptionBox();
		option1.text = "Option 1";
		hbox1.addComponent(option1);

		var option2 = new OptionBox();
		option2.text = "Option 2";
		hbox1.addComponent(option2);

		// Add horiontal container to vertical container.

		vbox1.addComponent(hbox1);

		// add spacer below options.

		var spacer1 = new Spacer();
		spacer1.height = 50;
		vbox1.addComponent(spacer1);

		// Add another button to the vertical container.

		var button2 = Toolkit.componentFromString('<vbox><button text="Button 2" /></vbox>', "xml");
		vbox1.addComponent(button2);

		// Add an area with absolute co-ordinates for child components, and add colored boxes.
		// Could also put the string in a text file in the Assets folder and use:
		//           var coloredBoxes = Toolkit.componentFromAsset("assets/coloredBoxes.txt");
		var coloredBoxes = Toolkit.componentFromString('
			<absolute width="200" height="200">
				<box id="box1" left="5" top="5" width="50px" height="50"
					style="background-color: red;border:0px solid red;background-opacity: .5" />
				<box id="box2" left="35" top="35" width="50px" height="50"
					style="background-color: green;border:0px solid green;background-opacity: .5" />
				<box id="box3" left="65" top="65" width="50px" height="50"
					style="background-color: blue;border:0px solid blue;background-opacity: .5" />
			</absolute>
		');

		Screen.instance.addComponent(picture);
		Screen.instance.addComponent(vbox1);
		coloredBoxes.left = vbox1.width;
		Screen.instance.addComponent(coloredBoxes);

	}
}
1 Like